How to cut and trim in the field
Cut and trim the material at your own risk. This technology is delicate and we always recommend you provide us the correct measurements so we can professionally cut to size at our facility eliminating any risk of material fault.
Measure 3x and we will cut once.
DO NOT use a razor knife
Ideally provide us the correct measurement’s and we will send a laser cut perfect ready to install piece. However if you have to trim a pair of stainless steel or titanium scissors will do the trick. Do not use a razor blade or knife it could cause delamination or leave a burr on the opposite side of the material causing it not to sit flush on the glass.
Below is our factory Smart Film Cutting Roller for reference
PLEASE NOTE: IF YOU DECIDE TO CUT AND TRIM YOUR SELF TO APPLY AN ACID FREE ADHESIVE ON THE CUT EDGES TO ELIMINATE ANY POSSIBILITY OF SPLITTING OR DELAMINATION. ALL WARRANTIES ARE VOID IF MATERIAL IS CUT OR TRIMMED BY ANYONE OTHER THAN AN AUTHORIZED PROVIDER/INSTALLER OR FACTORY DIRECT.
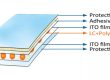
PDLC (Polymer Dispersed Liquid Crystal) smart film is a delicate material used in switchable glass applications. Cutting and trimming it requires precision to avoid damaging the conductive layers (ITO) or liquid crystal structure.
Tools Required for Cutting PDLC Film
| Tool | Purpose |
|---|---|
| Sharp Utility Knife / Precision Blade | For straight cuts (e.g., Olfa knife, X-Acto blade) |
| Metal Straight Edge / Ruler | Ensures straight cuts without slipping |
| Cutting Mat (Self-Healing) | Protects surfaces & extends blade life |
| Scissors (Sharp, Non-serrated) | For curved or small adjustments |
| Laser Cutter (Industrial Use) | High-precision automated cutting |
| Vinyl Plotter (Optional) | For complex shapes (e.g., circular cuts) |
Step-by-Step Cutting Process
Step 1: Measure & Mark the Film
- Use a dry-erase marker or low-tack masking tape to mark cutting lines.
- Avoid permanent markers (may stain) or excessive pressure (can damage ITO layer).
Step 2: Secure the Film for Cutting
- Place the PDLC film on a flat, clean surface (cutting mat recommended).
- Use weights or masking tape to prevent shifting during cutting.
Step 3: Make the Cut
Method A: Knife + Straight Edge (Best for Straight Cuts)
- Align a metal ruler along the marked line.
- Use a sharp blade to make a single, firm cut (do not saw back and forth).
- Apply light pressure—too much force can crack the ITO layer.
Method B: Scissors (For Curves or Small Trims)
- Use sharp, non-serrated scissors to avoid fraying edges.
- Cut slightly outside the marked line, then fine-trim if needed.
Method C: Laser Cutting (Industrial Precision)
- CO₂ laser (low power, ~10W) can cut PDLC film cleanly.
- Avoid excessive heat (may damage LC layer).
Step 4: Inspect & Clean Edges
- Check for frayed edges or delamination.
- Use isopropyl alcohol (IPA) to clean residue (do not soak the film).
Important Precautions
| ✅ Do’s | ❌ Don’ts |
|---|---|
| ✔ Use a sharp blade (dull blades cause jagged edges) | ✖ Bend or crease the film (can crack ITO) |
| ✔ Cut on a stable, flat surface | ✖ Use excessive heat (melts polymer layer) |
| ✔ Wear gloves to avoid fingerprints on adhesive | ✖ Peel layers apart (ruins PDLC structure) |
| ✔ Store unused film in a cool, dry place | ✖ Cut near powered electrodes (risk of short-circuit) |
Trimming After Installation
If the PDLC film is already applied to glass/window:
- Use a fresh blade to carefully trim excess film.
- Avoid scratching the substrate (glass/acrylic).
ndustrial vs. DIY Cutting
| Method | Best For | Precision | Risk of Damage |
|---|---|---|---|
| Hand Cutting (Knife/Scissors) | Small projects, DIY | Medium | Moderate (if done wrong) |
| Vinyl Plotter/Cutter | Complex shapes | High | Low (if calibrated) |
| Laser Cutting | Mass production | Very High | Low (with proper settings) |
Final Tips
- Test cut on a scrap piece first.
- Order pre-cut sizes if possible (many suppliers offer custom dimensions).
- Seal cut edges with clear adhesive if exposed to moisture.